A while back, I posted an initial review of the Grizzly T10010 Wet Grinder; you can read the review here. Well, after having used the machine for a while, I thought I would post a follow up and give some more thoughts. First, I still love this machine for sharpening and honing; it is SUPER fast and easy. Second, you will need some "3rd party" accessories. I've read that the best, most economical setup for this machine, as compared to a Tormek, is to buy this machine, but use the Tormek accessories since they will fit. I have to say that I TOTALLY agree! Out of the box, I was fighting the Grizzly straight edge jig that comes with the tool; it's just not very good. So, the first thing I bought was the Tormek Square Edge Jig from Highland Hardware. That was a huge impovement, but I still wasn't getting a completely square edge and had the feeling that my wheel was not completely trued up. So, my next purchase, from Highland Hardware, was Tormek Truing and Dressing Kit. This was perfect! I found that my wheel was about a 32nd of an inch off from end to end, but also was not perfectly round. So, after a couple of passes with the truing tool, and I had a nice level, perfectly round, surface. I then went to town on my hand plane blades and got them nice and flat for a change; so much better.
So, bottom line is, if you don't want to fork out the money for the Tormek system, can recommend the Grizzly T10010 Wet Grinder, but I would save some money to also buy the Tormek accessories; it makes a big difference!
Saturday, January 31, 2009
Monday, January 26, 2009
Cabriole Legs - Take Two
Ok, so I was not really pleased with my first cabriole leg design, so I decided to have another go at it. Using the template from my previous post I prepared another pine blank from a couple 2x4".
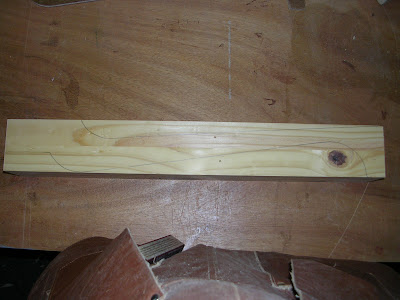
After it was dry I took it down to the final dimensions of 20" long by 2.75" square. I then traced the pattern onto the two adjacent sides.
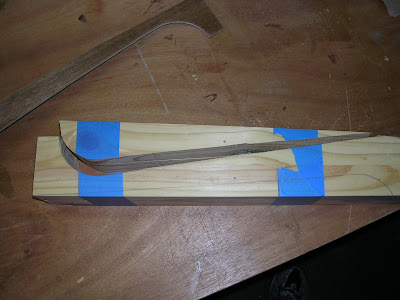
Then it was over to the bandsaw to cut it out. I made the first cut, saving the piece and taped it back on to provide support while cutting the second piece; simple blue tape works fine.
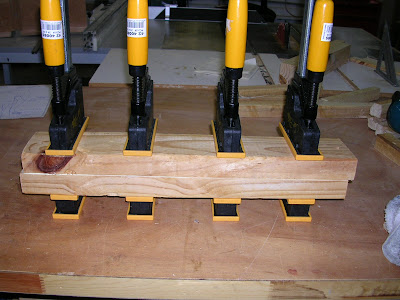
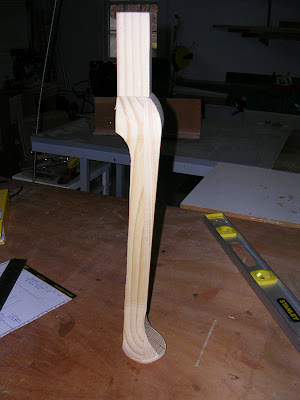
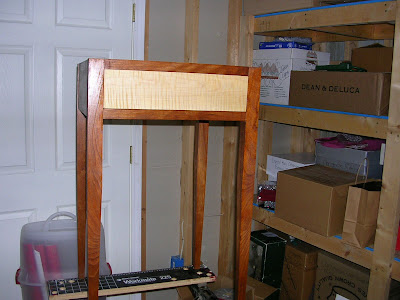
Finally, I had my ruffed out leg. You will notice in the picture below that the post is still the 2.75" square blank size; this is so I can put it on the lathe to turn the foot.
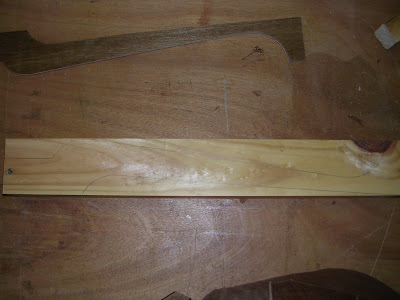
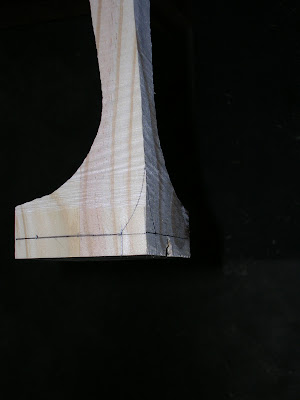
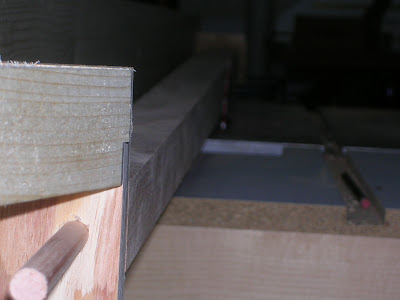
Before I turn the foot though, I need to relieve some material on the heel so I will not hit it while on the lathe. Here I have marked out the area I need to relieve; I will do that with a spokeshave.
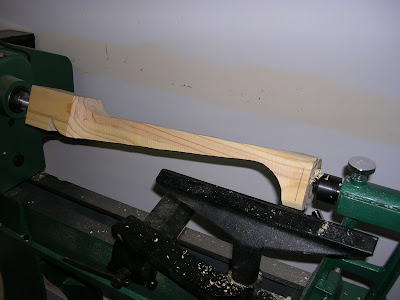
Now to the lathe to turn the foot. All I want to do here is round out the bottom of the foot and define the pad. You can see in the picture below that I have drawn a line to where I want the pad to be, it's a little big on this one and will be refined on the final version.
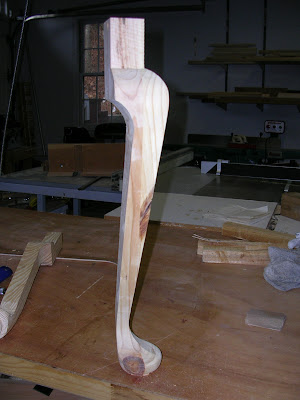
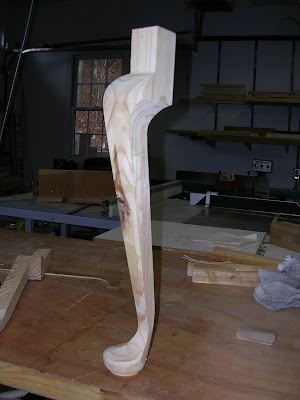
Finally, after some turning and some work with a combination of the spokeshave and rasp, I have a more "finished" product. Also note that after I was done with turning the foot that I cut the posts back on the bandsaw.
I posted this over on T-Chisel's forum and received some good feedback about rounding the edges a little more and making it with a little more "sweep" instead of being so straight so I need to look into that.
 |
| From Coffee Table |
After it was dry I took it down to the final dimensions of 20" long by 2.75" square. I then traced the pattern onto the two adjacent sides.
 |
| From Coffee Table |
 |
| From Coffee Table |
Then it was over to the bandsaw to cut it out. I made the first cut, saving the piece and taped it back on to provide support while cutting the second piece; simple blue tape works fine.
 |
| From Coffee Table |
Finally, I had my ruffed out leg. You will notice in the picture below that the post is still the 2.75" square blank size; this is so I can put it on the lathe to turn the foot.
 |
| From Coffee Table |
Before I turn the foot though, I need to relieve some material on the heel so I will not hit it while on the lathe. Here I have marked out the area I need to relieve; I will do that with a spokeshave.
 |
| From Coffee Table |
Now to the lathe to turn the foot. All I want to do here is round out the bottom of the foot and define the pad. You can see in the picture below that I have drawn a line to where I want the pad to be, it's a little big on this one and will be refined on the final version.
 |
| From Coffee Table |
Finally, after some turning and some work with a combination of the spokeshave and rasp, I have a more "finished" product. Also note that after I was done with turning the foot that I cut the posts back on the bandsaw.
 |
| From Coffee Table |
 |
| From Coffee Table |
I posted this over on T-Chisel's forum and received some good feedback about rounding the edges a little more and making it with a little more "sweep" instead of being so straight so I need to look into that.
Friday, January 23, 2009
New Project - Coffe Table
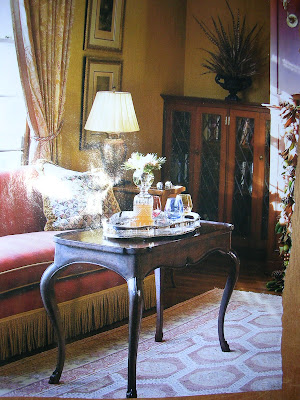
Time for a new project! This time around I'm going to be building a coffee table similar to the one pictured below. This is a photograph of one in a magazine.
Mine will not have the curved sides like this one, but straight sides. I will have the curve in the sides though so it's not so boxy. Also, the legs will not have that dramatic of a curve in them. This project is going to be several firsts for me. First, I've not done cabriole legs before. Second, the corners are scalloped and I've never done that before. Lastly, I will be using mahogany for the wood, I've not used it before so I'm looking forward to that.
My first order of business was to practice making the cabriole legs and finalize the design. I decided to practice on a couple 2x4 boards glued together. As usual, I didn't do a good job of documenting my procedures, but I will on the next test run. You can find a really good video tutorial on Charles Neil's website here: http://www.antiquesbuiltdaily.com/tips.htm I followed this basic procedure for my first attempt. Even before that, I had to go to Highland Hardware and get myself a smaller blade for my bandsaw. Once I had that, I was ready to begin. So following Charles's basic principles I created a template out of 1/4" plywood. The table is going to be 21" tall, with a 1" thick top so the legs need to be 20" tall. Also, I decided on 2 1/2" thickness for the leg blanks. Armed with that, I created the template, traced it to the legs and cut it out on the bandsaw.
I also used the lathe to round the foot and create the pad, that was pretty fun. I need a spokeshave to form the heel so I had to order one, can't believe I don't have one. I also need it to help clean up the marks from the bandsaw.
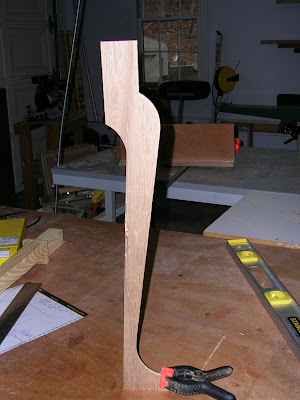
So, this is my first attempt, not too bad, but the design needs some work. First, the foot is way too fat. I can fix that easy enough by taking it down more on the lathe. Second, there is not enough curve in the leg; it looks a little too straight. Lastly, the post is too tall. I want the aprons of the table to integrate with the curve of the leg, like in the picture above. So, armed with that, I went to work to create a new template. In this new template the first thing I did was draw a line for my final post length and based everything off of that. Here is a shot of the new template.
This looks a little better, but the more I look at the picture I think i can make some improvements. I think I may move the curve behind the knee up a little and make it a little more dramatic. I do like the knee and the transition into the foot. The ankle may be a bit too thin, but this won't carry much weight so it may be alright. Also, I may need to push the foot and pad back about a half inch or more.
 |
| From Coffee Table |
Mine will not have the curved sides like this one, but straight sides. I will have the curve in the sides though so it's not so boxy. Also, the legs will not have that dramatic of a curve in them. This project is going to be several firsts for me. First, I've not done cabriole legs before. Second, the corners are scalloped and I've never done that before. Lastly, I will be using mahogany for the wood, I've not used it before so I'm looking forward to that.
My first order of business was to practice making the cabriole legs and finalize the design. I decided to practice on a couple 2x4 boards glued together. As usual, I didn't do a good job of documenting my procedures, but I will on the next test run. You can find a really good video tutorial on Charles Neil's website here: http://www.antiquesbuiltdaily.com/tips.htm I followed this basic procedure for my first attempt. Even before that, I had to go to Highland Hardware and get myself a smaller blade for my bandsaw. Once I had that, I was ready to begin. So following Charles's basic principles I created a template out of 1/4" plywood. The table is going to be 21" tall, with a 1" thick top so the legs need to be 20" tall. Also, I decided on 2 1/2" thickness for the leg blanks. Armed with that, I created the template, traced it to the legs and cut it out on the bandsaw.
 |
| From Coffee Table |
I also used the lathe to round the foot and create the pad, that was pretty fun. I need a spokeshave to form the heel so I had to order one, can't believe I don't have one. I also need it to help clean up the marks from the bandsaw.
So, this is my first attempt, not too bad, but the design needs some work. First, the foot is way too fat. I can fix that easy enough by taking it down more on the lathe. Second, there is not enough curve in the leg; it looks a little too straight. Lastly, the post is too tall. I want the aprons of the table to integrate with the curve of the leg, like in the picture above. So, armed with that, I went to work to create a new template. In this new template the first thing I did was draw a line for my final post length and based everything off of that. Here is a shot of the new template.
 |
| From Coffee Table |
This looks a little better, but the more I look at the picture I think i can make some improvements. I think I may move the curve behind the knee up a little and make it a little more dramatic. I do like the knee and the transition into the foot. The ankle may be a bit too thin, but this won't carry much weight so it may be alright. Also, I may need to push the foot and pad back about a half inch or more.
Wednesday, January 21, 2009
Workshop Reorganization
Well, I've decided to use the really cold weather here in the South to reorganize my shop. I'm working from a 2 car garage that measures about 21'x21'. My shop always seems to be a work in progress anyways, always changing and rearranging. I don't make any one particular type of furniture so I can't exactly set it up for, say, cabinet making, or chair making, etc. I'm trying to take the best advantage of my space, while keeping a good portion of floor space available. I also try and keep everything mobile. Here are a couple pictures of what my shop used to look like.
It has changed a lot since that picture, but the layout is very similar; table saw on the side of the shop, butted against the wall, band saw in between the garage doors, work bench behind the table saw, dust collector tucked in the corner with PVC ducting runs and then other items such as planer, miter saw, sander, etc on mobile bases. Since this time I have added a few things such as a clamp rack, 8" Grizzly jointer, Grizzly lathe, wood rack and some other odds and ends.
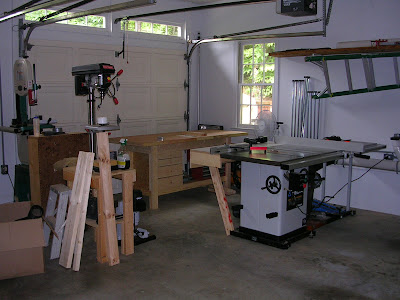
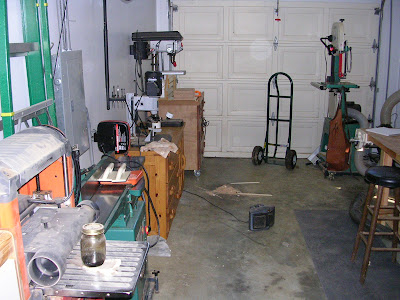
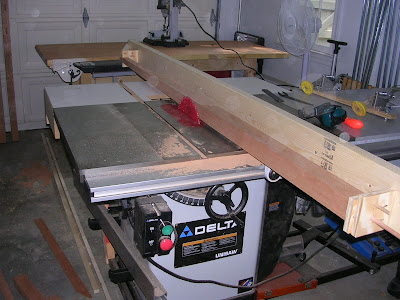
So, since that time I've tried to utilize more space. One thing that I decided upon before starting this is that I am going to start breaking down sheet goods in another part of the shop; trying to rip a full sheet of plywood by myself is difficult, dangerous and a pain. I've decided that when I do use sheet goods, I'm going to break them down on saw horses with a long straight edge and circular saw, then over to the table saw. So, with that, this is my new layout. I'm going to run with this for a while and see how it works out. In this first shot, this is the view from the door from the house into the garage; along this wall are my Ridgid planer, 6" Grizzly jointer, Delta mortiser and Craftsman drill press. I also have my router cabinet at the far end. My Grizzly band saw is in the same place in between the doors.
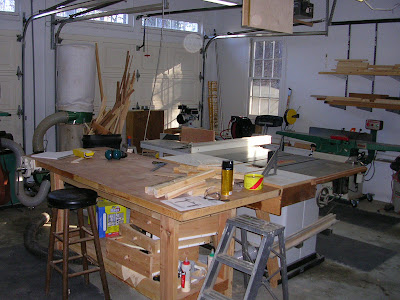
The next shot continues to the right and shows my bench now tucked directly up to the tablesaw, and my table saw in the middle of the garage; I really like this layout. You can see my Harbor Frieght dust collector, my air compressor is tucke in that back corner, and my Grizzly 8" jointer. Also, you can see part of my lumber rack on that wall; I don't keep a lot of lumber around so these racks work great.
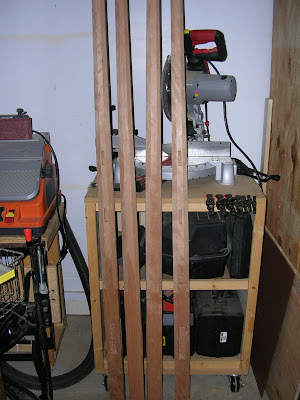
This last picture shows the rest of the shop, this is from one of the garage doors looking into the shop. Here you can my plywood storage on the left (where my DC used to be), then my new Grizzly lathe, my Ridgid spindle sander, clamp rack, miter saw and small power tool storage under that.
All in all I like this layout so far. I still have some random things to do like clear some more clutter out and re work the small extension table on my table say; I need it to extend the entire width of the back of the saw and right side table, right now there is a gap and this would give me more work space. Also, with this layout I basically have one garage door wide open so I can bring in lumber there, put it on the rack (right by the jointer) and prep it. Also, for sheet goods, I have enough room to layout some saw horses and break down the sheets and then move right to the table saw for the rest of the work. I do need to do a little work with the dust collection. Right now I don't have a good way to get a dedicated pipe to the 8" jointer without running it across the floor right where I would bring lumber in. I may by a long piece of flex hose and use that so I can unhook it whenever it's not in use.
 |
| From ShopPics |
 |
| From ShopPics |
It has changed a lot since that picture, but the layout is very similar; table saw on the side of the shop, butted against the wall, band saw in between the garage doors, work bench behind the table saw, dust collector tucked in the corner with PVC ducting runs and then other items such as planer, miter saw, sander, etc on mobile bases. Since this time I have added a few things such as a clamp rack, 8" Grizzly jointer, Grizzly lathe, wood rack and some other odds and ends.
So, since that time I've tried to utilize more space. One thing that I decided upon before starting this is that I am going to start breaking down sheet goods in another part of the shop; trying to rip a full sheet of plywood by myself is difficult, dangerous and a pain. I've decided that when I do use sheet goods, I'm going to break them down on saw horses with a long straight edge and circular saw, then over to the table saw. So, with that, this is my new layout. I'm going to run with this for a while and see how it works out. In this first shot, this is the view from the door from the house into the garage; along this wall are my Ridgid planer, 6" Grizzly jointer, Delta mortiser and Craftsman drill press. I also have my router cabinet at the far end. My Grizzly band saw is in the same place in between the doors.
 |
| From ShopPics |
The next shot continues to the right and shows my bench now tucked directly up to the tablesaw, and my table saw in the middle of the garage; I really like this layout. You can see my Harbor Frieght dust collector, my air compressor is tucke in that back corner, and my Grizzly 8" jointer. Also, you can see part of my lumber rack on that wall; I don't keep a lot of lumber around so these racks work great.
 |
| From ShopPics |
This last picture shows the rest of the shop, this is from one of the garage doors looking into the shop. Here you can my plywood storage on the left (where my DC used to be), then my new Grizzly lathe, my Ridgid spindle sander, clamp rack, miter saw and small power tool storage under that.
 |
| From ShopPics |
All in all I like this layout so far. I still have some random things to do like clear some more clutter out and re work the small extension table on my table say; I need it to extend the entire width of the back of the saw and right side table, right now there is a gap and this would give me more work space. Also, with this layout I basically have one garage door wide open so I can bring in lumber there, put it on the rack (right by the jointer) and prep it. Also, for sheet goods, I have enough room to layout some saw horses and break down the sheets and then move right to the table saw for the rest of the work. I do need to do a little work with the dust collection. Right now I don't have a good way to get a dedicated pipe to the 8" jointer without running it across the floor right where I would bring lumber in. I may by a long piece of flex hose and use that so I can unhook it whenever it's not in use.
Tuesday, January 13, 2009
Face Frame with biscuits tip
So, while I was building an E-desk (more on this later) I made a sort of rookie mistake with face frames and biscuits. I guess it's not really a rookie mistake, I just was not paying attention and thinking of things before I was doing them. Anyways, I wanted to use face frame biscuits to attach the rails to the stiles; for some reason I think pocket screws, although great, or just too much for this - I might re-think that. Anyways, in this first picture you can see I've laid out the lines for where I want biscuits to go; I like to put my two stiles together and lay out the lines together to avoid errors while transferring lines. You can also see in this picture that I've cut the biscuits too, but I will show you what I did wrong.
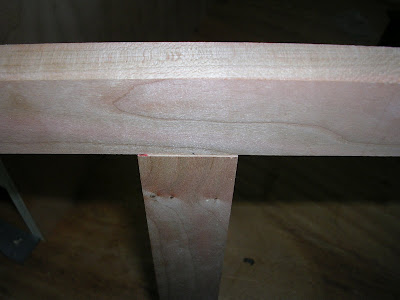
Ok, it may be a bit hard to see, but this is how I laid the pieces out when I cut them with the biscuit jointer; can you see what I did wrong? Basically, I cut them from the same side, not opposite sides. What I mean by this is, I cut them out as I laid them out; what I needed to do was to flip one of the stiles end for end like in this picture.
If you can see in this one, my slots are now offset. Why is this the right way? Unless you have your jointer set to cut perfectly in the center of the board, you will, if you cut from the same reference side on both pieces, end up with an offset of your rail to stile however much your bit is off of center. See picture:
This maybe isn't even a 1/16th of an inch off, but it's off and not easily fixed without causing other problems.
What you need to do, if you are using biscuits, is to mark the outter face on all your rails and stiles. This will help you understand to what reference point you need to put the fence of your biscuit jointer. In my example here, becuase I was cutting them as I laid them out, I was then putting the biscuit jointer fence on the face of one stile, then on the BACK of the other stile, causeing the offset. If I would have marked the face on both of them, and cut from that as a reference, then I would have been fine. Make sense? So, mark all of the faces of your rails and stiles and use that as the reference point for cutting all of your slots. I eventually got it figured out by doing another piece and got it attached.
Happy and safe woodworking!
 |
| From E-Workbench |
Ok, it may be a bit hard to see, but this is how I laid the pieces out when I cut them with the biscuit jointer; can you see what I did wrong? Basically, I cut them from the same side, not opposite sides. What I mean by this is, I cut them out as I laid them out; what I needed to do was to flip one of the stiles end for end like in this picture.
 |
| From E-Workbench |
If you can see in this one, my slots are now offset. Why is this the right way? Unless you have your jointer set to cut perfectly in the center of the board, you will, if you cut from the same reference side on both pieces, end up with an offset of your rail to stile however much your bit is off of center. See picture:
 |
| From E-Workbench |
This maybe isn't even a 1/16th of an inch off, but it's off and not easily fixed without causing other problems.
What you need to do, if you are using biscuits, is to mark the outter face on all your rails and stiles. This will help you understand to what reference point you need to put the fence of your biscuit jointer. In my example here, becuase I was cutting them as I laid them out, I was then putting the biscuit jointer fence on the face of one stile, then on the BACK of the other stile, causeing the offset. If I would have marked the face on both of them, and cut from that as a reference, then I would have been fine. Make sense? So, mark all of the faces of your rails and stiles and use that as the reference point for cutting all of your slots. I eventually got it figured out by doing another piece and got it attached.
 |
| From E-Workbench |
Happy and safe woodworking!
Wednesday, January 7, 2009
Bedside Tables - Cherry
After I completed my pencil post bed, I needed to make a set of matching tables to go with it. I based this off of a New Yankee design that I really liked. The main table is made from cherry, but has a tiger maple drawer. I really like the contrast of cherry and maple, and tiger maple is probably my most favorite wood; I just love the way it looks.
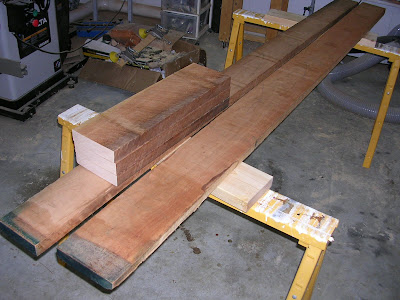
I don't have any pictures of making the main table part (I need to get better about that!), but I do have several of the making of the top and then the finish. The plans called for a 1" thick top, so the first thing to do was cut some rough 5/4 stock to about an inch oversize. Here you can see 3 of the 4 pieces needed for this top.
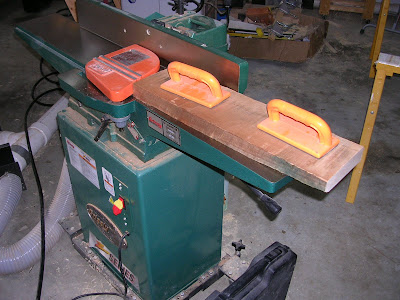
Next was to face joint the boards to get one side flat.
Once I have one side flat, I run each piece through the planer to get down to the final 1" thickness.
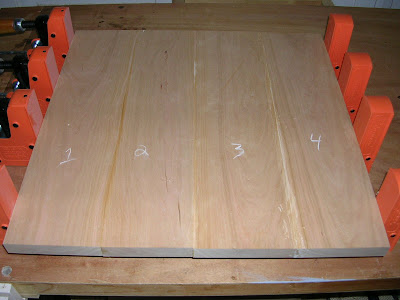
After the boards were planed to thickness, I started to see how I wanted them oriented. I did this before I planed them, but sometimes after planing, things can change a little. This is a rough idea of what I came up with; subject to change without notice:
Then it was back to the jointer to joint the endges to get them ready for glue up.
Here they are glued up. If you look closely, you can see I change the orientation once again.
After all the glue was cleaned up it was time to cut to size, final sand and then begin the finish process. I've talked about my finish for cherry before, but again what I do is start with a heavy coat of BLO. Here is one top coated in BLO.
Now, after a few minutes, but before it dries, I will start adding the Watco Walnut colored Danish Oil. Here are two tops side by side after a few coats. You can notice the difference in how the color changes based on how the light hits it; the one the right looks much lighter, but it's the same. That really messed with me while I was working on it.
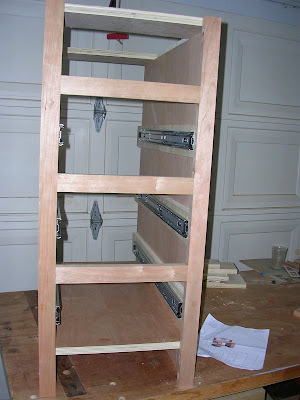
As for the rest of the table, it gets the same finish except for the tiger maple. All I did for that was put on several coats of BLO. Once they are all dried, I wipe on 3-5 coats of a satin poly. Here is one of the bases with the drawer in it.
What I really like about the finish, eventhough it is tricky, is that you can still keep the cherry grain that everyone loves. If you look at the legs on this table, you can still see the crazy grain pattern that it has. I have noticed that over time, this does not change but actually gets more enhanced and deeper.
I don't have any pictures of making the main table part (I need to get better about that!), but I do have several of the making of the top and then the finish. The plans called for a 1" thick top, so the first thing to do was cut some rough 5/4 stock to about an inch oversize. Here you can see 3 of the 4 pieces needed for this top.
 |
| From Cherry Side Tables |
Next was to face joint the boards to get one side flat.
 |
| From Cherry Side Tables |
Once I have one side flat, I run each piece through the planer to get down to the final 1" thickness.
 |
| From Cherry Side Tables |
After the boards were planed to thickness, I started to see how I wanted them oriented. I did this before I planed them, but sometimes after planing, things can change a little. This is a rough idea of what I came up with; subject to change without notice:
 |
| From Cherry Side Tables |
Then it was back to the jointer to joint the endges to get them ready for glue up.
 |
| From Cherry Side Tables |
Here they are glued up. If you look closely, you can see I change the orientation once again.
 |
| From Cherry Side Tables |
After all the glue was cleaned up it was time to cut to size, final sand and then begin the finish process. I've talked about my finish for cherry before, but again what I do is start with a heavy coat of BLO. Here is one top coated in BLO.
 |
| From Cherry Side Tables |
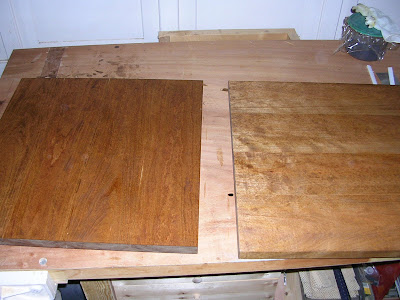
Now, after a few minutes, but before it dries, I will start adding the Watco Walnut colored Danish Oil. Here are two tops side by side after a few coats. You can notice the difference in how the color changes based on how the light hits it; the one the right looks much lighter, but it's the same. That really messed with me while I was working on it.
 |
| From Cherry Side Tables |
As for the rest of the table, it gets the same finish except for the tiger maple. All I did for that was put on several coats of BLO. Once they are all dried, I wipe on 3-5 coats of a satin poly. Here is one of the bases with the drawer in it.
 |
| From Cherry Side Tables |
What I really like about the finish, eventhough it is tricky, is that you can still keep the cherry grain that everyone loves. If you look at the legs on this table, you can still see the crazy grain pattern that it has. I have noticed that over time, this does not change but actually gets more enhanced and deeper.
Monday, January 5, 2009
Pencil Post Bed - Cherry - Part 2
Ok, so in Part 1 I went through the process of prepping all the stock for the posts and rails; this was by far the longest part of the whole build process. After that was done, it was time to shape the posts. This part was BY FAR the most nerve wracking part of the process. After having gone through all of the trouble to make the boards nice and flat, and square, one misstep would have ruined the whole post. So, the first thing I needed to do was a build a jig, a long jig. I went to the local "big box" store and found the straightes 2x6 board I could find; I was fortunate to get a good one. Next I had to build a sort of indexing system (this came from the plans I went by to build the bed). Basically, it's two sqare disks with holes drilled at vaious points; these points give you the tapers that you need. In the case of this bed, 4 sides were tapered all the way through; the other four side had stopped tapers, more on that later. Basically, how the indexing jig works is, you drill a hole in the center of the bottom of the post; this is how the post will rotate/spin. Next you screw the reference disk to the bottom of the post, aligning the rotation hole. This inner disk has the 8 holes drilled into it for the tapers, each one is numbered so you know what order to make your cuts. The outer disk only had two holes, one for the pivot point in the center, and another indexing pin that matches the 8 other holes that were drilled through the inner disk. Below is a picture of the whole setup.
Once I had the whole thing built, it still took me over an hour to get up the nerve to make the cuts! Once I got started though, it was a piece of cake. Here is a shot, not a great one, looking back down the jig.
And here are all four posts done with the tapers.
Now, remember that 4 sides on each post recieve a stopped taper. This is becuase I chose to include the lambs tounge detail. Using a pattern, I outlined the curve on each side of the posts and used a carving knife, file and sandpaper to do the details; 16 in all (4 each post). This was not nearly as hard as I thought it would be. I have a picture of the finished product below.
Basically, that was all of the hardest parts. The only other challange was drilling long, straight, holes for the bed bolts for the rails. I simply used a dowel jig to get the hole started and then finished it up. Below are some pictures of the final project.
Lambs Toung detail:
Rails:
Whole bed:
The finish is sort of my own making I suppose. The bed is cherry, so I really just wanted to put some boiled lindseed oil (BLO) on it and some wipe on polyurethane, but my wife wanted a darker, aged look. So, what I typically do now is, I will put a heavy coat of BLO onto the piece and let it soak in good. Then, I use at least 3 coats of Watco, walnut colored, Danish oil. Simply wipe it on with a rag, let it set for a minute, and wipe off any that remains. The key to this is to have the surface as smooth as possible. Then, I simply put on 5 coats of a satin wipe on poly.
Overall, this was one of my most challenging projects, again due to the size, but it was pretty fun looking back on it. Let me know your thoughts...
 |
| From PencilPostBed |
Once I had the whole thing built, it still took me over an hour to get up the nerve to make the cuts! Once I got started though, it was a piece of cake. Here is a shot, not a great one, looking back down the jig.
 |
| From PencilPostBed |
And here are all four posts done with the tapers.
 |
| From PencilPostBed |
Now, remember that 4 sides on each post recieve a stopped taper. This is becuase I chose to include the lambs tounge detail. Using a pattern, I outlined the curve on each side of the posts and used a carving knife, file and sandpaper to do the details; 16 in all (4 each post). This was not nearly as hard as I thought it would be. I have a picture of the finished product below.
Basically, that was all of the hardest parts. The only other challange was drilling long, straight, holes for the bed bolts for the rails. I simply used a dowel jig to get the hole started and then finished it up. Below are some pictures of the final project.
Lambs Toung detail:
 |
| From PencilPostBed |
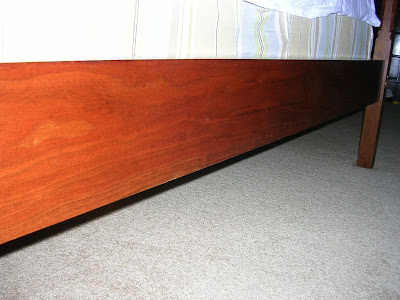
Rails:
 |
| From PencilPostBed |
Whole bed:
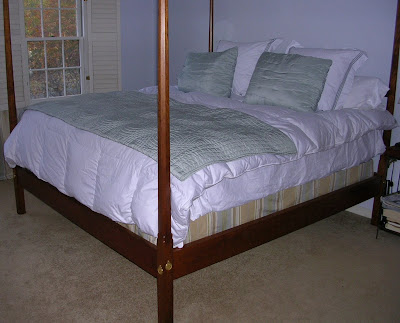 |
| From PencilPostBed |
The finish is sort of my own making I suppose. The bed is cherry, so I really just wanted to put some boiled lindseed oil (BLO) on it and some wipe on polyurethane, but my wife wanted a darker, aged look. So, what I typically do now is, I will put a heavy coat of BLO onto the piece and let it soak in good. Then, I use at least 3 coats of Watco, walnut colored, Danish oil. Simply wipe it on with a rag, let it set for a minute, and wipe off any that remains. The key to this is to have the surface as smooth as possible. Then, I simply put on 5 coats of a satin wipe on poly.
Overall, this was one of my most challenging projects, again due to the size, but it was pretty fun looking back on it. Let me know your thoughts...
Saturday, January 3, 2009
Pencil Post Bed - Cherry - Part 1
A few years ago I decided to undertake a project that I thought would be no problem; a King sized pencil post bed. After all, it' only had 9 pieces, how hard could it be? Well, the challenge with this bed was the fact that I had not dealt with single pieces of wood this large as a finished size. First, it is important to note that all the pieces are made from a single piece of solid cherry, not pieces glued together to make thicker pieces. The posts were made from 12/4 cherry, to a finished size of 2.5"x2.5" and the rails from 6/4 cherry, to a finished size of 1.5"x6". Selecting the stock was tricky because I needed to find pieces wide enough, long enough, and relatively straight enough; I needed as straight of grain stock as I could find.
So, after picking through stock at my local lumber store, Peach State Lumber, I came home with this stash.
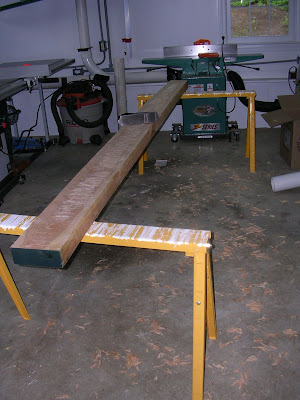
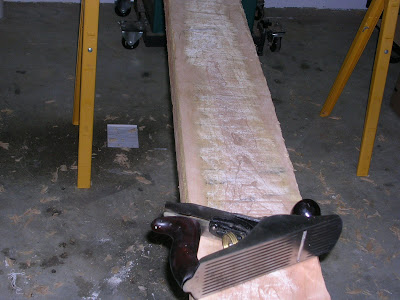
The pieces were pretty straight, no curves or bows in them, but they did have a cup in them. With all pieces having a finished length of over 70+", they were too big for my power tools so it was off to hand tools. I started by hand planing one side as flat as possible, then I could feed it through my power planer. This is the setup for hand planing them flat.
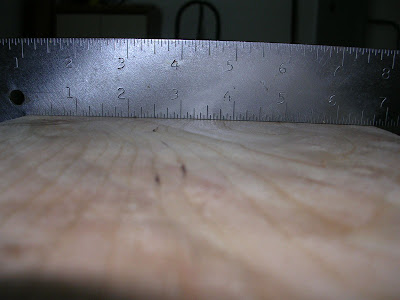
You can see in this picture below how I use chalk to keep up with my progress, while also checking with a square. Anywhere chalk shows up, I know there is still more to be taken away.
Finally! After a couple days of planing, and thinking my arms were going to fall off, I have a flat side.
Now that I had one flat side, I could use my power planer to do the other side and go to final thickness. I had to use some out feed supports due to the length.
Once I had all the pieces milled to thickness, it was back to the hand plane to flatten and smooth one edge.
Once that edge was smooth, I could rip the pieces on the table saw to near finished width, leaving myself a little room for cleanup with a hand plane again.
That takes care of the milling of all the wood. In the next part, I will talk about the process of creating the pencil tapers, and how nerve racking that was, as well as creating the lambs tongue detail.
So, after picking through stock at my local lumber store, Peach State Lumber, I came home with this stash.
 |
| From PencilPostBed |
The pieces were pretty straight, no curves or bows in them, but they did have a cup in them. With all pieces having a finished length of over 70+", they were too big for my power tools so it was off to hand tools. I started by hand planing one side as flat as possible, then I could feed it through my power planer. This is the setup for hand planing them flat.
 |
| From PencilPostBed |
You can see in this picture below how I use chalk to keep up with my progress, while also checking with a square. Anywhere chalk shows up, I know there is still more to be taken away.
 |
| From PencilPostBed |
Finally! After a couple days of planing, and thinking my arms were going to fall off, I have a flat side.
 |
| From PencilPostBed |
Now that I had one flat side, I could use my power planer to do the other side and go to final thickness. I had to use some out feed supports due to the length.
 |
| From PencilPostBed |
Once I had all the pieces milled to thickness, it was back to the hand plane to flatten and smooth one edge.
 |
| From PencilPostBed |
Once that edge was smooth, I could rip the pieces on the table saw to near finished width, leaving myself a little room for cleanup with a hand plane again.
That takes care of the milling of all the wood. In the next part, I will talk about the process of creating the pencil tapers, and how nerve racking that was, as well as creating the lambs tongue detail.
Subscribe to:
Posts (Atom)