As some of you may, or may not, know I'm a fan of Tommy MacDonald, aka T-Chisel, over at t-chisel.com. His work is amazing and the videos he has are some of the best around; they are raw, real and chock full of information. I recommend spending some time, a lot of time, and going through the bombe secretary videos; this piece is AMAZING! I love to go back and just watch some of these videos as they are just inspiring to me in the fact that Tommy does an awesome job of taking something that is complicated, or seems daunting, and breaks it down into its most simple form and makes it look easy. It was this inspiration/attitude that made me want to build the coffee table with a double bead time, cabriole legs, etc. Definitely check out his site and his videos; heck, sign up for the forum too!
So anyways, today I was cruising around The 207 Forum and came across a post that mentioned that Tommy is in the process of getting with WGBH out of Boston. This would be amazing! I know the shows would be better "quality" in the fact that the videos that Tommy has on his site are pretty raw with him walking around with a camera on a tri pod, but there is something neat about that to me. Anyways, I think it would be amazing for Tommy to have a show to validate the hard work he has done, and put on display all of his amazing work and talent. The other great thing about Tommy is how much he gives back to the woodworking community. Just look at his videos and all the information he gives for free on those things! Also, the 207, there are some great build alongs and other things on there; just full of information.
Below is a video "announcement" of the show...check back with his site for more details:
Saturday, February 27, 2010
Tuesday, February 23, 2010
Media Cabinet - Final Stages
Well, I am in the final stages of the media cabinet! I'm pumped and can see the finish line. Over the weekend we finally had some amazing weather so I was able to spend a good deal of time working on the cabinet. I was able to rout the profile around the bottom of the cabinet and then glue the vertical partitions into place. Next, I was able to dry fit all of the back panels; for these I just used ship lapped panels that will free float. One thing I did was to leave a good bit of space in the center section, at the top, to allow plenty of air flow and cable routing. I also took a page out of Marc Spagnuolo's book and his media cabinet build where he inset the middle back panel a couple of inches so you could put the power strip there and all the cable routing would fit in there and be hidden and allow you to put the cabinet further against the wall; great idea!
After the vertical partitions were dried, I got to work final fitting all the shelves and got those lightly glued into place. Lastly, I put the center doors back in and did the final fitting of those to make sure I had enough clearance all the way around each door. Then it was time to do any glue removal and finish sanding to prepare for the finish. One thing I like to do is to wait a few hours for the dust to settle, literally, then wipe the whole piece down with mineral spirits. This does a couple of things. First, it gets all the saw dust off of the piece. Next, it allows you to see any blemishes or glue spots that you may have missed and allows you to touch those up before putting on the finish.
For the finish I am applying a couple coats of Watco Danish Oil. Once that is good and dry (after a few days) I am going to spray several coats of shellac on it. This may be about another week or so away as the weather is supposed to turn pretty cold again for the next several days.
A couple construction Items I still need to do are to scrape and sand the top, rout the profile on it and apply the finish. I also need to feet on the base as well, but that will be last. Nearing the end!
Be Safe!
Friday, February 19, 2010
WoodTreks - Great Woodworking Site!
About a month ago I stumbled across a great woodworking website I had never seen before, nor ever heard of; that site is WoodTreks. WoodTreks is a video blog by woodworker and filmmaker Keith Cruickshank. When I first saw the site I thought "man, this is kind of cool!"...then after about 4 straight hours spent on the site I thought "man! This IS cool!". The site is all video podcasts and has several categories from materials, techniques, tools as well as artisan profiles; I really like the artisan profiles, and the materials videos are pretty incredible you get to walk through a lumber mill and see how they process logs.
When you watch one of the videos, one of the first things you think is "is this from a TV show?". Keith's film making background is very apparent in the great quality videos and sound. What's even more neat, to me, is you don't even know he's there...it's like you are standing there with the artisan and they are talking to you.
About the site itself. One of the first things you notice about the site is how clean it is; no unnecessary graphics, no ads, no pop-ups, just great content. Next, when you click on the videos, again, no ads, no endorsement, nothing...except if you consider "watch more of my free videos" an ad or endorsement. Oh, did I mention free? Yep, free! No subscription, no registration, just click on the video and go! You can, as I have, subscribe to his site, via an RSS feed or through email, if you like as well so you don't miss a single episode. While you are there, don't forget to go to the Links section and check out some of the other blogs and sites that Keith has there; there are a ton of great sites there.
WoodTreks, it's full of great information, it's clean and concise, and best of all...it's FREE!
Saturday, February 13, 2010
Media Cabinet - Pocket Doors Completed
So I was able to get some shop time in today and work on the pocket doors. In my last post, I was making the center door panels. I got those all milled up, door built and ready to go. I used my mock up for a little while back and drilled out the door hinges, mounted the slides and was off to the races. Here is a shot of the two doors mounted and side-by-side.
They overlap about 1/8" in the middle, which is ok as it will allow me some room to trim and true up the doors. Here is a shot of the doors opened.
I sort of messed up when I ordered the hardware because, as you can see, the doors to slide back all the way. When I was ordering them, it was not clear to how much travel they would have, but I got sign off from the boss (wife) that it was fine the way it is.
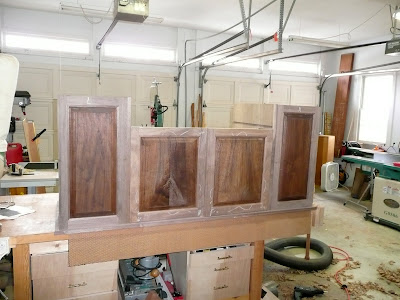
So, that is all I wanted to get done today, so mission accomplished. I still need to clean the glue from the doors and sand them down a bit. I'm in the home stretch though! All I need to do now is mill up all of the shelving, rout the profiles into the top and bottom, add the feet and apply the finish. Here are a couple more shots of the front with the two side swing out doors set into place.
Be Safe!
 |
| From MediaCabinet |
They overlap about 1/8" in the middle, which is ok as it will allow me some room to trim and true up the doors. Here is a shot of the doors opened.
 |
| From MediaCabinet |
I sort of messed up when I ordered the hardware because, as you can see, the doors to slide back all the way. When I was ordering them, it was not clear to how much travel they would have, but I got sign off from the boss (wife) that it was fine the way it is.
So, that is all I wanted to get done today, so mission accomplished. I still need to clean the glue from the doors and sand them down a bit. I'm in the home stretch though! All I need to do now is mill up all of the shelving, rout the profiles into the top and bottom, add the feet and apply the finish. Here are a couple more shots of the front with the two side swing out doors set into place.
 |
| From MediaCabinet |
 |
| From MediaCabinet |
Be Safe!
Monday, February 8, 2010
Media Cabinet Progressing
Over the weekend I was able to get a good bit done on the Walnut Media Cabinet. Last time, I had cut the first set of dado's into the bottom to accept the vertical partitions. What I needed to do, after fitting the outer partitions was to construct the swing out doors. I need to do this before routing the next set of dado's so I know exactly where they are supposed to go; basing the cuts off of the actual piece and not pre-determined measurements has saved me a few times.
First I needed to route the dado for the two shelves that will be in the swing out doors.
Then I attach the bottoms, which are dovetailed.
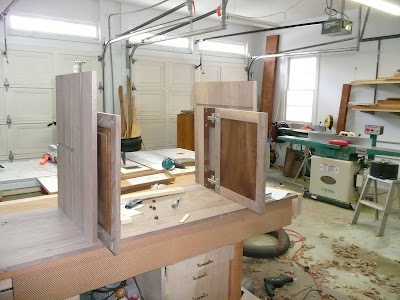
Then I glue them together. Here you can see the front of one, and the back of the other.
Once that is done, I use these doors to mark the location of the next set of dado's for the inner partitions and rout them.
Here are the partitions just dry fit so you can get an idea of how it will go together.
Notice how the outer partitions do not come all the way to the front; that is where the swing out doors go. This is a close up of the partition in the dado.
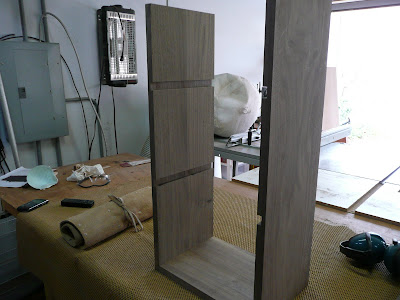
I'm using pocket doors for the two center doors. I've not used them before so I am doing a little pre-layout so I know what to expect with my real doors.
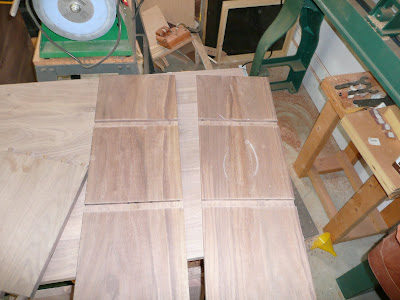
Next, I needed to begin to construct the two middle doors. So I book matched some 8/4 boards to make the center panels.
I just love the grain on these, especially the one on the left. I actually didn't see this grain until I had milled it and cut them apart. Now the are glued up and ready for me to route the profiles on them and assemble them, just like the doors before.
Once these doors are put together I am going to see what wood I have left and what is left to be done. I thought I would have enough to do the whole thing, but I am going to be short on the wood needed for all the shelves and the back panels. So it will be back to the lumber yard this week so I can be ready for the weekend.
Be Safe!
First I needed to route the dado for the two shelves that will be in the swing out doors.
 |
| From MediaCabinet |
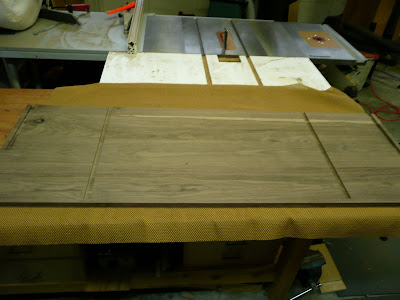
Then I attach the bottoms, which are dovetailed.
 |
| From MediaCabinet |
Then I glue them together. Here you can see the front of one, and the back of the other.
 |
| From MediaCabinet |
Once that is done, I use these doors to mark the location of the next set of dado's for the inner partitions and rout them.
 |
| From MediaCabinet |
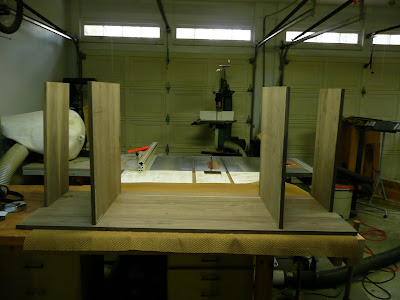
Here are the partitions just dry fit so you can get an idea of how it will go together.
 |
| From MediaCabinet |
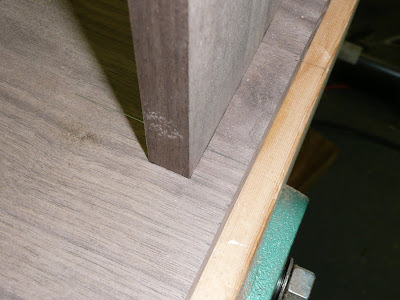
Notice how the outer partitions do not come all the way to the front; that is where the swing out doors go. This is a close up of the partition in the dado.
 |
| From MediaCabinet |
I'm using pocket doors for the two center doors. I've not used them before so I am doing a little pre-layout so I know what to expect with my real doors.
 |
| From MediaCabinet |
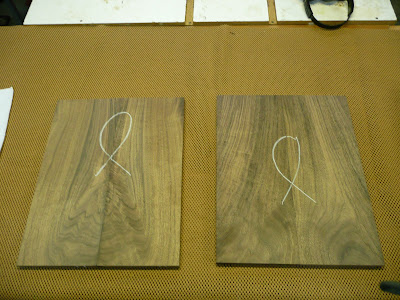
Next, I needed to begin to construct the two middle doors. So I book matched some 8/4 boards to make the center panels.
 |
| From MediaCabinet |
I just love the grain on these, especially the one on the left. I actually didn't see this grain until I had milled it and cut them apart. Now the are glued up and ready for me to route the profiles on them and assemble them, just like the doors before.
Once these doors are put together I am going to see what wood I have left and what is left to be done. I thought I would have enough to do the whole thing, but I am going to be short on the wood needed for all the shelves and the back panels. So it will be back to the lumber yard this week so I can be ready for the weekend.
Be Safe!
Subscribe to:
Posts (Atom)